Basic Sample Application
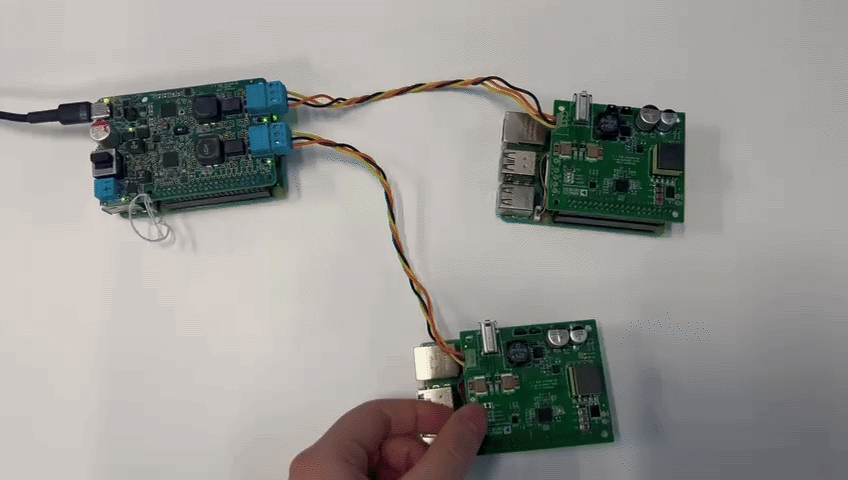
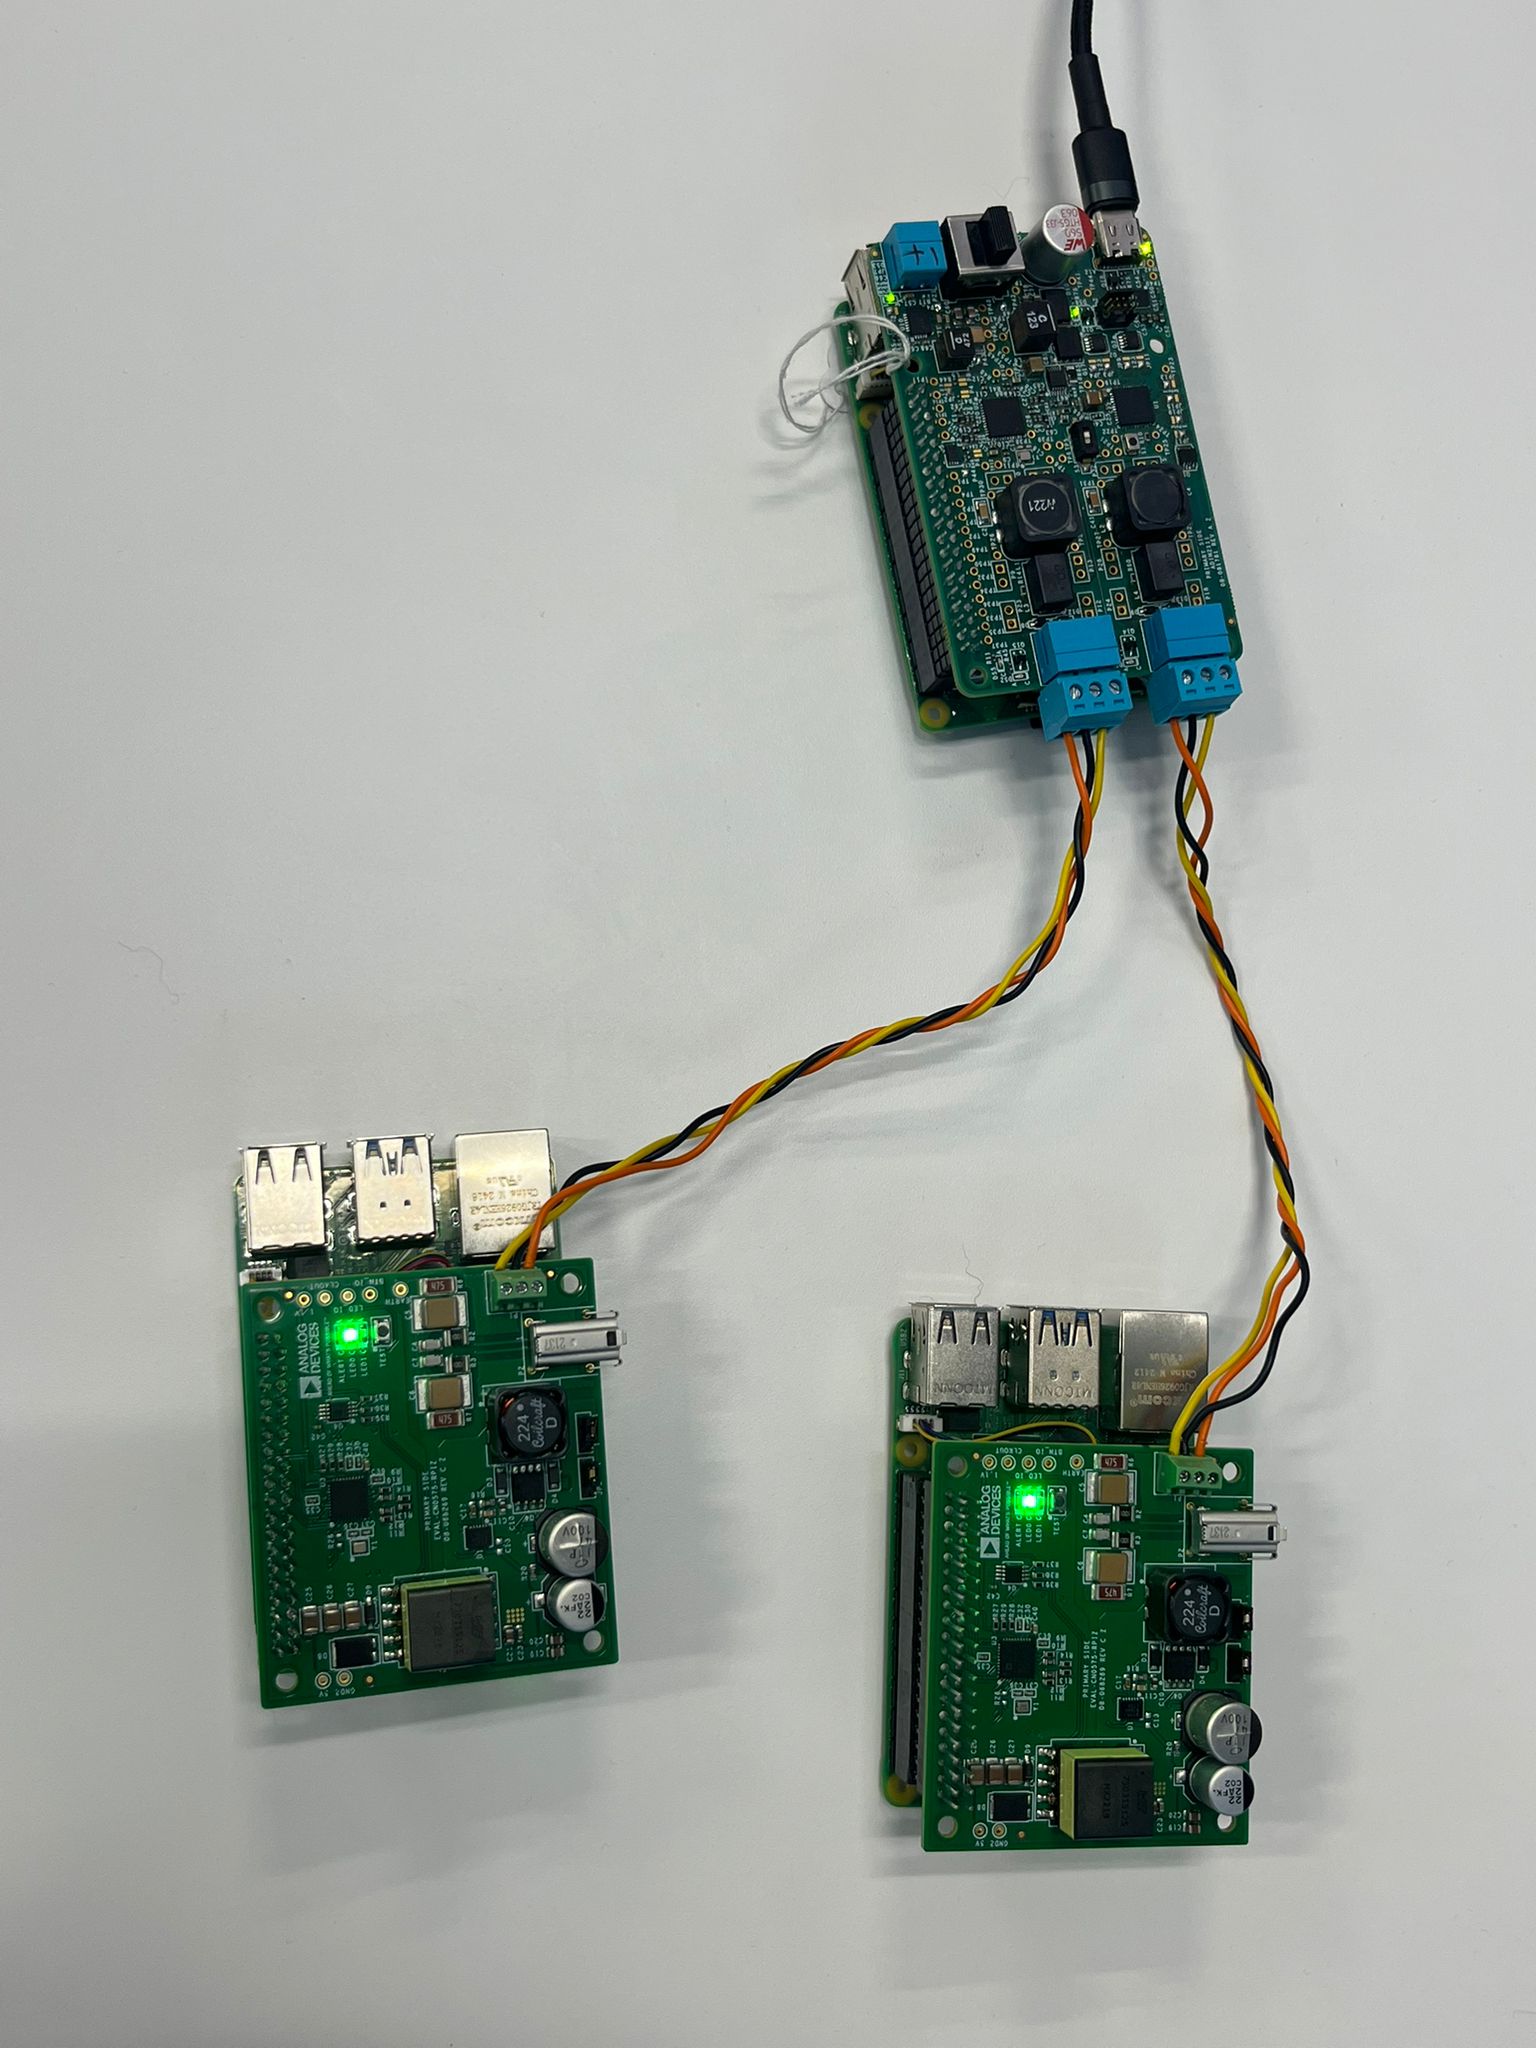
This simple sample application demonstrates how to get started with the AD-RPI-T1LPSE-SL HAT by creating a basic Blinky demo. It uses two EVAL-CN0575-RPIZ (10BASE-T1L Field Device Development Platform with Class 12 and 13 SPoE) HATs, an AD-RPI-T1LPSE-SL HAT as a communication interface, and three Raspberry Pi computers. These are set up in a parent-child configuration, where the AD-RPI-T1LPSE-SL HAT acts as the parent device, and the two EVAL-CN0575-RPIZ HATs act as child devices. The application toggles the on-board LED of a EVAL-CN0575-RPIZ HAT when the button is pressed on the other EVAL-CN0575-RPIZ HAT and vice versa.
Hardware Setup
Equipment Needed
1x AD-RPI-T1LPSE-SL Board
2x EVAL-CN0575-RPIZ Boards
3x Raspberry Pi 5 computers running Kuiper 2
1x USB Type-C Power Supply (at least 9V, 3A; 9V/12V/15V/20V supported)
2x T1L Cables
Setup Procedure
Connect the AD-RPI-T1LPSE-SL board and both EVAL-CN0575-RPIZ boards to Raspberry Pis via the 40-pin header.
Connect the power supply to the AD-RPI-T1LPSE-SL HAT using the USB Type-C port.
Connect the two Raspberry Pi that are interfaced with the EVAL-CN0575-RPIZ HATs to the AD-RPI-T1LPSE-SL HAT using T1L cables.
Power on the Raspberry Pi computers.
Software Setup
Prerequisites
Three Raspberry Pi computers with kuiper-linux image installed. Follow the instructions in the Kuiper 2 User Guide to prepare the Raspberry Pi.
ADI Kuiper Linux includes Python and pyadi-iio, but the versions may lag behind that required for this demo. This demo was tested with Python 3.8-3.11, and the main branch of pyadi-iio.
Git command-line tools installed.
The easiest way to configure Kuiper and install dependencies is with a locally attached monitor, keyboard, and network connection. One Raspberry Pi can be used to configure all three cards, swapping SD cards accordingly afterwards. Log into Kuiper Linux and open a terminal. When running commands with sudo, you might be prompted to enter the password for the analog user. If you have not changed it, the default password is analog.
Pyadi-iio Cloning and Installation
Clone the repository on the parent Raspberry Pi (with the AD-RPI-T1LPSE-SL HAT):
analog@analog:~$
git clone https://github.com/analogdevicesinc/pyadi-iio.git
analog@analog:~$
cd pyadi-iio
From the pyadi-iio directory, install Python dependencies and open a virtual environment:
analog@analog:~$
cd ~/pyadi-iio
analog@analog:~/pyadi-iio$
python3 -m venv ./venv
analog@analog:~/pyadi-iio$
source venv/bin/activate
analog@analog:~/pyadi-iio$
pip install -e .
Applying Overlays
Overlays are required to enable the proper device tree configurations for the HATs.
In order to apply the overlays, open a terminal on each Raspberry Pi and follow these steps:
For the parent Raspberry Pi:
analog@analog:~$
sudo tee -a /boot/firmware/config.txt <<'EOF'
  dtoverlay=rpi-t1lpse-class12
  EOF
Warning
Use
rpi-t1lpse-class12when an LTC9111 chip is available (as on the EVAL-CN0575-RPIZ). Therpi-t1lpse-aploverlay should only be used when no LTC9111 chip is present. Usingaplbypasses voltage compatibility checks and sources the selected voltage level (24V/54V) directly to the downstream device, which may damage incompatible equipment.For each child Raspberry Pi:
analog@analog:~$
sudo tee -a /boot/firmware/config.txt <<'EOF'
  dtoverlay=rpi-cn0575
  EOF
Reboot the Raspberry Pi computers to apply the changes:
analog@analog::~$sudo reboot
Hostname Setup
Each Raspberry Pi must have a unique hostname to avoid network conflicts.
On each Raspberry Pi, open a terminal and enter the following command to edit the hostname file.
Keep in mind that <new_hostname> should be replaced with a unique name for each Raspberry Pi. We used analog for the parent Raspberry Pi, cn0575a for the first child Raspberry Pi, and cn0575b for the second child Raspberry Pi.
analog@analog:~$
hostnamectl set-hostname <new_hostname>
Network Setup
Each Raspberry Pi must be configured with a static IP address to ensure reliable communication.
For our demo, we will use the following IP addresses:
The Raspberry Pi with AD-RPI-T1LPSE-SL HAT (parent): 192.168.10.1/25 on eth1 and 192.168.10.129/25 on eth2
First Raspberry Pi with EVAL-CN0575-RPIZ HAT (first child): 192.168.10.2/25 on eth1
Second Raspberry Pi with EVAL-CN0575-RPIZ HAT (second child): 192.168.10.130/25 on eth1
Open the terminal and write the following commands:
On the parent Raspberry Pi, with the AD-RPI-T1LPSE-SL HAT:
analog@analog:~$
sudo nmcli con add type ethernet ifname eth1 con-name t1l-cn0575a \
    ipv4.method manual ipv4.addresses 192.168.10.1/25 \
    connection.autoconnect yes
analog@analog:~$
sudo nmcli con add type ethernet ifname eth2 con-name t1l-cn0575b \
     ipv4.method manual ipv4.addresses 192.168.10.129/25 \
     connection.autoconnect yes
analog@analog:~$
sudo nmcli con up t1l-cn0575a
analog@analog:~$
sudo nmcli con up t1l-cn0575b
On the first child Raspberry Pi, with the first EVAL-CN0575-RPIZ HAT:
analog@analog:~$
sudo nmcli con add type ethernet ifname eth1 con-name t1l-master \
  ipv4.method manual ipv4.addresses 192.168.10.2/25 \
  connection.autoconnect yes
analog@analog:~$
sudo nmcli con up t1l-master
On the second child Raspberry Pi, with the second EVAL-CN0575-RPIZ HAT:
analog@analog:~$
sudo nmcli con add type ethernet ifname eth1 con-name t1l-master \
  ipv4.method manual ipv4.addresses 192.168.10.130/25 \
  connection.autoconnect yes
analog@analog:~$
sudo nmcli con up t1l-master
Reboot all the Raspberry Pi computers to apply the changes:
analog@analog::~$
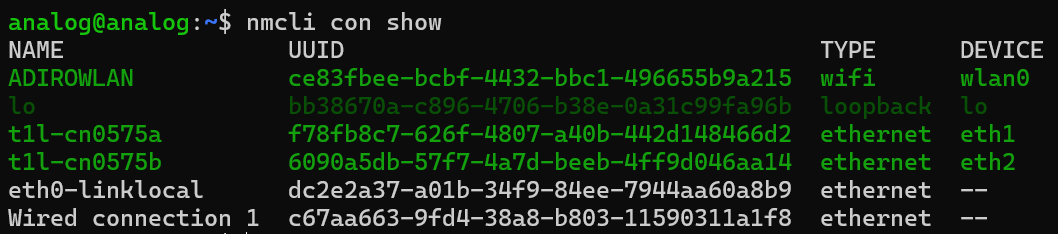
sudo rebootVerify that the new connections are active on each Raspberry Pi:
analog@analog:~$
nmcli connection show
Application Execution
When executed, the demo continously reads the state of the button the CN0575 HAT and toggles the LED on the other CN0575 HAT if pressed and vice versa. The code is run on the parent only, which communicates with both child devices using libiio.
Run the application the parent Raspberry Pi only, which will handle communication with both child devices.